
Cursor is more than just a fork of Visual Studio Code IDE. It takes the power and flexibility of Code (including supporting extensions) and builds AI into the workflow seamlessly. Over the last year, the quality of Cursor has gone through the roof, with regular updates (sometimes multiple times a week) that adds better integration.
In this piece I am going to go over how to get the most of Cursor, and stop thinking of it like just another flavor of Code. You can use Cursor as your general chat into AI, as it has a lot of features that most chat UI’s do not have. This is not an exhaustive review by any stretch.
Installation
Pop on over to Cursor and get it downloaded and installed. It will ask you if you want to import all your Code settings (including extensions). Open it up and you will probably won’t notice anything much different. Good. We’re off to a great start – familiarity straight out of the gate. Though, closer inspection you will notice a few subtle nods to AI with the “Agent” panel.

Now let’s get this out of the way, the industry has fallen in love with the word “agent” that invokes such romantic sci-fi notions. It’s basically a chat session. A chat session that can make changes for you, but it is just a chat session. You have can multiple “agents” open at the same time – ergo multi chat windows open at the same time. They can still be answering/addressing your query as you are doing other things.
So let’s open our first “agent”.

Chat Modes
Opening your first agent, you will be presented with a very familiar AI chat window, sitting there begging for input. The typical controls are there, including the ability to upload an image or turn on voice-to-text. There is a few other controls here, that I will come back to later. For the time being – ignore.
We have 4 primary modes of which, you will spend most of your time in 2 of them. I am going to dive into each of these in more detail, but as an overview here is what we have:
- Agent
While you are chatting with the AI, it will actively make changes to the code base after which you can review before accepting. - Plan
You in a discussion in what you want it to do, building out a literal plan of steps. - Debug
Actively debugging a piece of code/system. - Ask
Your traditional open-form AI chat session, with no changes.
Selecting the mode will dramatically change the way Cursor handles your questions/directions. I am going to explain these a little out of order.
Ask Mode
Ask mode is basically your 1-on-1 with the AI, permitting you to ask questions in a safe environment, without it trying to update code, or add to your plan. If you were trying to figure out which node module or Java library was best for doing something or other, then this would be the mode you would go into. You will notice though it is a little more cold than favorite OpenAI/Claude response. It is more to the point and won’t stroke your ego about how great you are (it can, more on that later). I personally like this – straight to the point, no fluff.
This is the mode you would use if you are looking at an existing code base and you want to understand what it is doing. You can ask it questions about the code and it will attempt to go off and find things.
Debug Mode
Debug mode, is used when you are trying to find a bug that may not be quickly obvious by looking at the code. It will observe stack traces, add logging, to determine the root cause of a problem. Agent mode generally does a good-enough job of catching the majority of issues by simply copying in the stack-trace or error message, but Debug mode can do it in real time as you are running up an application locally.
Plan Mode
Now we get into the mode that you should be spending most of your time in. This is where the world of “vibe engineering” kicks in. If you are vibing in Agent mode, then you are climbing a mountain with no safety ropes. Agent mode it can work for smaller tasks, but anything that involves clean builds, or multiple files, DANGER WILL ROBINSON.
Plan mode is where no files are created or touched. This is where you build out a plan on what you want an “agent” to go off and do. You list out each step very clearly, which libraries to use, coding standards, where it should put files. As you go through figuring out the architecture, the AI will suggest things, highlight potential problems, so you are working together as you solve a problem.

The plan in reality, is just a markdown file that is stored (.cursor/plans) that is written out in human readable instructions. Think of this as the detail you have in a Jira ticket to hand off to a developer to complete. You can iterate over this plan, many times, drilling down into as much detail as you feel comfortable.
The less detail you have, the more latitude you are giving the implementation AI agent. A plan that is “Go build me a Pac-man game” is indeed a valid plan. Lacks detail, even user requirements, but in the absence of direction, it will make it’s own decisions. This is where slop kicks in. Sometimes you don’t care about the slop, you just want to build some throwable, run-once sort of utility. “Disposable apps” is the new trendy //yawn// term we have come up with to justify this noise.
A good plan should be extremely detailed, and you can (and should) spend a few hours on this stage alone. Every prompt you send in the plan mode, it will be asking you clarifying questions, inspecting the existing code base (if there is one) to determine what it thinks are some of the inherit standards. It will then update the markdown file that you will see being built in front of your eyes in an open tab on Cursor.
The plan is your opportunity to review everything before you let it off to do its thing. Since this is just a file at the end of the day, you can take this file, and save it for later. You can ask it to review this plan for you to see if you have missed anything (I will show you a trick to this validation layer later on when I talk about AI model selection).
Important to remember, no files where harmed in this process. It will look at your existing files, but it will not be modifying anything.
Agent Mode
Now we are at the heart of the AI beast – where the shit can hit the fan. In this mode, you have an eager young puppy that is just itching to get off and running and do something. Let us talk through the two main usages of agent mode.
If you have gone through the plan mode, then you can relax a little, because you have already worked through everything you want it to do. When you are ready you can “Build Plan” which kicks up a new chat window that will then go through and execute, creating/modifying files, pulling in libraries doing what it needs to do to complete. Depending on the length of the plan, this can take significant time (5-30minutes in some cases).
Once it has completed a plan, you get a chance to review all the files/changes it has made before you are committing (saving) them. If there is something you don’t like then, then you can prompt directly and ask it to change it.
The other way of using this mode, is directing it to do things on-the-fly as it where. You ask it to review a file and make a change. Now there is a couple of tricks in this world. You can narrow down the scope of what you want it to do, but using the @ character in the chat and that will let you select a file, directory or rule (more on that soon). This directs the agent to only focus on that area and not go off doing things it shouldn’t. Very handy for doing code changes to a given module (directory) without it going off into it’s own world.

Another usage, is selecting a piece of code in an open file and hitting CTRL-L that will then scope your agent to only that piece of code. You can use this, to rewrite things that you are not quite happy with, like a loop, or removing a SonarQube warning (or rework some regex!).
With each step here you will get a chance to review the changes and these are presented like a version-control change experience where you can review the before and after. You can give it permission to run various commands so it may get better detail (basic Linux commands such as grep etc.) as well as CLI’s such as gh (GitHub), Jira etc.
So those are the basics of how to use these modes and what you can do. Very powerful so far. Wait there is more.
Model Selection
Up to this point, I have not mentioned the underlying models that is used to drive your agents. You have control over this, if you wish. I leave it in “Auto” mode most of the time, as frankly I have not noticed any discernable difference between them all, outside of the cost, for the vast majority of tasks.

In Auto mode, Cursor will determine which underlying model your prompt should be directed towards that will best answer you. It won’t always choose the most expensive or the cheapest. You can of course override this by unselecting Auto and you will be presented with a range of options and models.
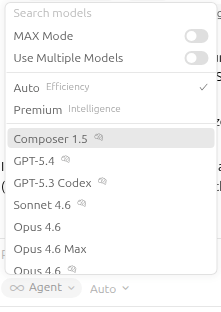
These models have different costs and context windows associated with them, so choose wisely, as your Cursor “we’ve just billed your credit-card for usage” emails will come fast and furious. Cursor has the ability to go against local models and self-hosted models (AWS Bedrock for example) by registering it in your settings. This approach is garnering more support as the reality of the cost of AI starts to sink in.
Now why wouldn’t you just want to use the best model every time, if cost was no object? There is no point. If I just need to pop down the road to get a loaf of bread, I don’t need to take the Aston Martin. It will gain me nothing except to cost more (outside of bragging rights that I have an Aston parked in the lot – which I don’t own incase you were wondering). Most AI requests do not need the most expensive model.
This is where Cursor really kicks ass over a model specific tool set. The big AI companies are desperate for you to stay inside of their toolset and ecosystem, as they want you as a captured paying audience. The difference between them all is becoming unnoticeable. Cursor decides the best one for you at the time.
But there is a good reason to switch into a specific model every so often. I do this in a couple of scenarios.
One way, when I am validating a plan that I have labored over. I will start up a couple of new agents (read chat windows) and manually set the agent, and then ask it to review the plan and make updates/suggestions. Sometimes they will catch something the other didn’t but this is becoming less and less now.
The second way, which is a little more interesting/fun, is to have different agents build the plan for you. You can then compare their outputs. I will blow away the code and have it go again to see what it comes up with. If your plan is strong, you will see very little variance. Again, it is a fun thing to do every so often, but you will discover there is no real difference. Any difference is most likely your own confirmation bias (I know ModelXYZ is the best and I just proved it there).
Now let’s talk about the real power of Cursor. Rules.
.cursor/rules
If you have not created any rules in your project, then you are not using your Cursor or AI anywhere to its maximum. Vibing without a strong detailed plan, and/or rules, is what creates the AI slop. It is racing a NASCAR around a track with no safety gear, not even a helmet.

Rules are basically markdown files (with the .md or .mdc extension) that are placed in various directories through out your project, named ./cursor/rules/, that contain instructions/guidelines that you want the AI agent to adhere to when working with files in that directory and below.
A good example, is putting your teams high level coding standards for a given language, up at the root directory, say ./cursor/rules/typescript.md. This would be a markdown file that explicitly lists all the instructions that you want it to follow when creating typescript files. Here is an example from https://cursor.directory/nextjs-react-typescript-cursor-rules.
You are an expert in TypeScript, Node.js, Next.js App Router,
React, Shadcn UI, Radix UI and Tailwind.

  Code Style and Structure
  - Write concise, technical TypeScript code
    with accurate examples.
  - Use functional and declarative programming
    patterns; avoid classes.
  - Prefer iteration and modularization over code duplication.
  - Use descriptive variable names with auxiliary verbs
    (e.g., isLoading, hasError).
  - Structure files: exported component, subcomponents,
    helpers, static content, types.

  Naming Conventions
  - Use lowercase with dashes for directories
    (e.g., components/auth-wizard).
  - Favor named exports for components.

  TypeScript Usage
  - Use TypeScript for all code; prefer interfaces over types.
  - Avoid enums; use maps instead.
  - Use functional components with TypeScript interfaces.

  Syntax and Formatting
  - Use the "function" keyword for pure functions.
  - Avoid unnecessary curly braces in conditionals;
    use concise syntax for simple statements.
  - Use declarative JSX.

  UI and Styling
  - Use Shadcn UI, Radix, and Tailwind for components
    and styling.
  - Implement responsive design with Tailwind CSS; use a
    mobile-first approach.

  Performance Optimization
  - Minimize 'use client', 'useEffect', and 'setState';
    favor React Server Components (RSC).
  - Wrap client components in Suspense with fallback.
  - Use dynamic loading for non-critical components.
  - Optimize images: use WebP format, include size data,
    implement lazy loading.

  Key Conventions
  - Use 'nuqs' for URL search parameter state management.
  - Optimize Web Vitals (LCP, CLS, FID).
  - Limit 'use client':
    - Favor server components and Next.js SSR.
    - Use only for Web API access in small components.
    - Avoid for data fetching or state management.

 Follow Next.js docs for Data Fetching,
 Rendering, and Routing.
This lets you create various contextual rules that keeps the AI within narrow bounds. It gets better.
There is a special header that you place at the top of the markdown files that give Cursor more context to know when to apply the rules. You name these files with the .mdc extension. You have a handful of directives that control when the rule is applied. You can define the folders/extensions that a given rule is applied.
For more details you can read them here https://cursor.com/docs/rules#rule-anatomy
---description: When handling javascript filesglobs: *.jsalwaysApply: true---
Rules are automatically applied, but you can @ them inside a given prompt to force it to follow a given rule. You do this when you have a rule that isn’t used that much, but you want to pull it in as and when you want, so you would set the directive applyManual: true and then @ it explicitly in your prompt.
Keeping rules small and concise is better than one big huge rule (Cursor recommends no more than 500 lines in a single rule file). You want to ensure rules are applied intelligently and not loaded for every prompt you do, as that will fill the context window with irrelevant information.
Say you have a repo that has frontend and backend code. The rules for each will be slightly different, so you can split them apart and have the rules for the backend, under that folder, and vice-versa.
Rules are something you shouldn’t write once and forget, especially when first starting off in a project. When you are building your plan, and you discover the AI doing something that you don’t agree with, or want something different, you can add that restriction to the plan. Say you want to make sure it always uses the axios module for making HTTPS calls, you would add that rule. Treat the rule as if you were telling a developer.
After the first wave of plan implementation and you look through the code, this is when you want to adapt/update your rules as you find things you don’t agree with. It is important to go through this, so you can build up trust in future output. We are dealing with a non-deterministic toolset here, and you need to put up as much guardrails as possible to produce as readable, maintainable code as possible.
When defining rules, think more high-level and design patterns. You don’t need to get into the nitty gritty. Precise coding standards for example (spaces vs. tabs), you can enforce using a linter (prettier for example), but you can add to your global rule that any code it produces, it must run through the linter prior to saving.
Examples of rules are database schemas, directions to use standard libraries (if you have a specific way to always get a database connection). In the absence of these, it will do a best-guess based on the code that has already written, but in a fresh project, it is best to lay these out from the beginning.
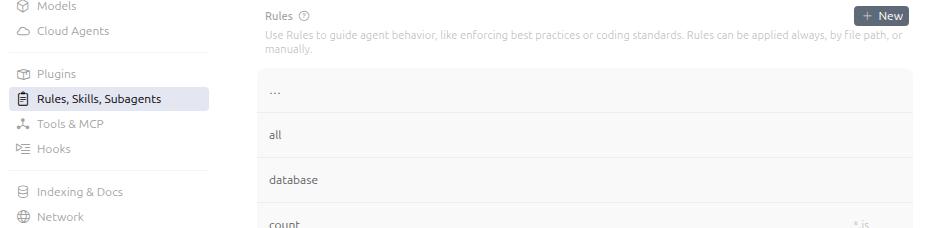
These rules should be committed so everyone is using the same guardrails. You can confirm your rules are being picked up by going to Cursor’s settings, and selecting the “Rules” section, and you will see all the files it has picked up from your projects directory.
So before I wrap up, let us have a quick look at context windows.
Context Window
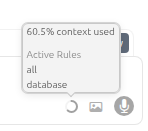
A context window is how much memory a given model will work with in a given session. These are narrow, and once a context window is filled up, it begins to forget things you told it prior. If you find a given instruction is no longer being applied, then chances are you’ve used up your context window, and it has moved that out, favoring new information. Some models will try to compact the window, to get as much as you can. How can you tell how much you are using?

There is an icon in the bottom right of your prompt box, that is indicator of the amount memory you have used up, as a percentage, and hovering over it, gives you some extra insights.
Unfortunately there is not a way to clear the context, you need to create a new chat/agent session. That said you can open as many as you want at the same time, each one working on a different area or action on the code base.
and there is more
This is not an exhaustive review by any means. There is so much more Cursor can do, including hooking into MCP Servers, invoking agents running on other machines working with Git etc.
AI has changed the way developers produce and interact with code, that does not mean you get to remove your hand from the wheel completely. Laying down the guardrails and guidelines, is vital to ensure you are building a code base that is not only clean, adaptable but maintainable and has clean design principals.
Getting consistency in a non-deterministic world is the key. You want to depend on it like you would a senior seasoned developer. Utilizing the rules, reviewing code at each step, is the way to make AI truly work for you.
In summary:
- Cursor is an AI Orchestrator: It is not just a VS Code fork; it is a tool for managing different AI “modes” (Ask, Debug, Plan, Agent) to control how much autonomy the model has.
- Plan Mode is the Safety Net: High-level architectural planning in a
.mdfile prevents “slop” and “AI hallucinations” before a single line of code is written. - Rules are the Guardrails: Using
.mdcfiles andglobsis the only way to ensure consistency across a large codebase without repeating yourself in every prompt.
Further reading:
AI Disclaimer: Gemini Nano Banana Pro was used to generate the photos – from the ’60s Oceans 11, and ’06 Talladega Nights The Ballad of Ricky Bobby movies.


![[Review] PostgreSQL Mistakes and How to Avoid Them](https://alan.is/wp-content/uploads/2026/02/mycousinvinny-small.png?w=643)

