Historically anytime I have ever had to interface with SalesForce, I have utilized their SOAP API. SOAP is a horrible nasty piece of technology that puts way more overhead on communications than is really required. Handling SOAP within Java is an even more pain in the ass as you wrestle with WSDL’s to create/compile your local representations of objects. Fortunately there is now a much easier way and for my latest project I got an excuse to take it for a proper spin.
 SalesForce offers an alternative to its SOAP API and that is the lightweight REST API, with JSON packets flying back and forth chewing up the minimal of bandwidth. I can attest that it is an absolute joy to use.
For anyone that is aspiring to cast aside the chains of SOAP (which I will call the old days) and move to a lighter world I offer the following to help you along the way. All the source code is available on my Github page. I have written a small Java wrapper class that makes interacting with the REST API extremely easy, including re authenticating the token if a call fails.
1. Configure SalesForce
In the old days you accessed the SOAP API with a username and password. In the REST world the initial authentication is a little more complicated. SalesForce uses OAUTH2.0 to secure incoming requests. Fortunately they use a number different mechanisms within OAUTH2.0 but I am going to focus on the Username-Password method – which basically involves making a call to a given endpoint and retrieving a token to which all subsequent requests will be validated against.
 However, before you do that, you must first register your application with your SalesForce instance. When you make your API calls it is this app that the calls will belong to and you can set the various security rights etc at an app level.
Login to your SalesForce account and then navigate to the ‘Setup’ area and look for the ‘Build’ area, and select the ‘Apps’ from the Create menu.
Within the ‘Connected Apps’ panel, click the [New] button and you will be presented with the following form to fill out. It looks a little frightening at first blush but there isn’t a huge amount of data required here.

Give your application a name, something you will know, and a Contact Email address. Now since we are using the Username-Password method, we don’t have a lot of fields to fill out there. You do want to click the ‘Enable OAuth Settings’ checkbox, and in the ‘Callback URL’ simply add https://login.salesforce.com. Next you will choose the security roles to which your app will belong to. This can change at a later date, but select ‘Full access’ to begin with, which gives your app the same level of access your traditional SOAP API had.
Then save out the form and you are nearly done. There is a couple of pieces of information you need to grab. Once saved, it will be displayed in your list of connected apps, click the [Manage] button.
For retrieving the API session token, you need additional information, which is the ‘Consumer Key‘ and the ‘Consumer Secret‘. Take a note of these two values as you will need them later.
2. Retrieving your session token
To retrieve your session token you need to make an HTTP POST to the https://login.salesforce.com/services/oauth2/token endpoint. Good news, this is the only time you will hard code a URL to SalesForce – from here on in, all the URL’s that required will be told to you over the wire. You need 5 pieces of information:
- grant_type
password - username
<one of your salesforce users> - password
<their password><their access token> - client_id
<the consumer key from the connected app> - client_secret
<the consumer secret from the connected app>
Assuming you have setup everything correctly then you should get the following JSON block back. If you are not successful then SalesForce is very good with its error and status responses so you should be able to quickly resolve any issue.

This block has everything you need in it to interact with their API endpoints. The session will time out (response code 401) so you just have to call this login process again to retrieve a new token.
An important piece here is the host name for your company described in the ‘instance_url‘ key. This will be the root URL of all your REST calls.
You can see the Java code, doSessionExecution(), for this here at my Github repository.
3. Authenticating requests
Once you have your token you need to add in the ‘Authorization’ header to all HTTP calls with the token_type and the access_token. Using the session block retrieved in the previous section we would create our authorization as follows:
![]()
In my Java code, getAuthorization(), I simply pull out the two keys from my HashMap and concatenate them together.
We are nearly ready to start making calls to the API. However, there is one small step that will make life a lot easier – a quick introspection of your company’s objects to determine all their endpoints.
4. Introspecting your objects
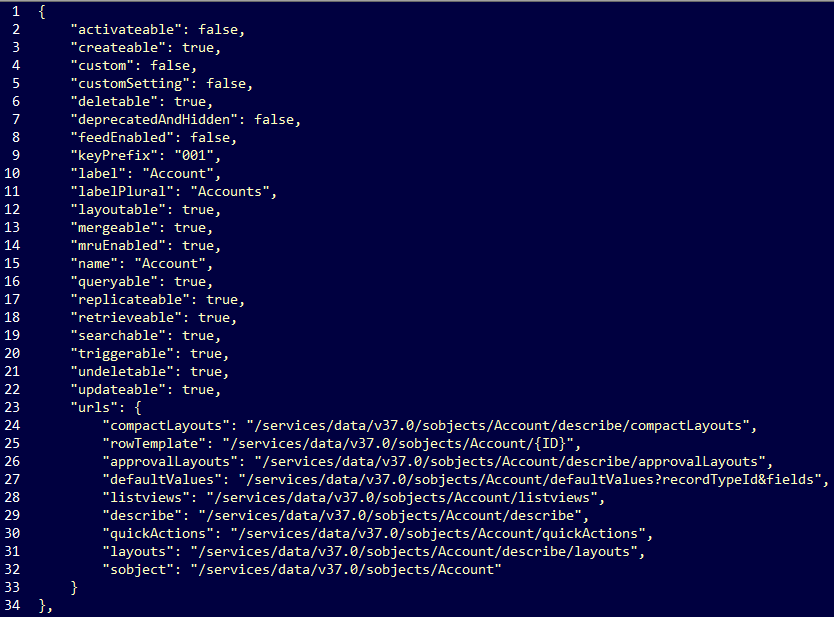
SalesForce will return a list of all your objects and their corresponding high-level properties including the REST URL’s to which you can perform operations with. This callback does not include all the field properties for the object, there is another call for that, SObject Describe.
A JSON packet is returned with all your objects listed. Here is a snippet from that return block highlighting the standard ‘Account‘ object. Notice the ‘urls‘ inner object detailing all the endpoints we will use for interacting with our object.

In my Java code, doDescribeObjects(), I pull these objects out from their original JSON array and put them in a HashMap keyed on the object name for faster retrieval at a later date.
Now we have everything we need to interact with the API minimizing the amount of hard coded URL’s we have in our application to a single one; the initial login one.
5. Retrieving an object
Retrieving the value of an object, we just need its 15 character Id (yes only the short version of the Id, not the previous quirk of the 18 character Id) and the endpoint for that given object. We perform an HTTP GET on that URL appending the Id. So the raw HTTP header call to https://na30.salesforce.com would be:

This returns back a JSON object representing the current value of that SalesForce object. If you look at my Java code, get( String object, String id ), you can see where I create the URL from the instance_url from our original login request, and then using the URI from the describe objects call earlier.
6. Updating, Creating and Deleting objects
To update, create or delete an object you can use the same URL you created in section 5 but change the HTTP method type.
- PATCH
For updating an existing object - POST
For creating a brand new object - DELETE
For deleting a previous object
A small tip, if your underlying HTTP library does not offer convenient access to a given HTTP method you can use the POST method and add the query parameter ‘?_HttpMethod=PATCH‘ to the end of it. Nice touch SalesForce!
7. Misc. endpoints
There are many different endpoints you can choose to interact with, that will span across multiple objects. For example you have query objects, get the last updated objects, the latest objects deleted. The API is extremely well covered and more importantly documented very extensively.
Each API call needs to be authorized, which you do the exact same thing as detailed here. All you need to know now, is which API endpoint to call and how to interact with the data returned.
8. API Limits
SalesForce limits its use of the API (which interestingly enough you can determine what your limits are through an API call – assuming you have credit left!). You can read about the limits here, but the key to remember is to not hit the API too quickly in quick succession. That will result in you getting denied for a little while.
However, there is an easy way to determine how much you are currently using within your allocated daily limit. Each API request, returns the Sforce-Limit-Info header that details just how much you have chewed up thus far as an organization.
I hope this has helped you with the SalesForce REST API, especially if you are coming from the SOAP world.
SalesForce has its place in the corporate landscape and given its size and reach, the company isn’t going away anytime soon. Working and integrating SalesForce into your applications is significantly easier than it was in the SOAP days with their REST API.